Friday, March 6, 2015

A few more reveals for March...

Can't...stop...playing...


I have been having a blast playing with these delish papers from Chic tags...the colours are so fun and vibrant!! Perfect for some aquatic adventures in paradise!! LOL!!

I was so inpsired by a pinterest layout I posted last month that had diecut clouds out of its background that I decided to give it a go...I was too nervous to bust out my cameo to cut a full 12x12 sheet so I trimmed my papers down to 3.75" so they would fit through my big shot. This was supposed to be my practice sheet but before I knew it , I had it put together and stuck down!! LOL!! Did strips of paper and washi tape behind the cut outs...super quick and easy peasey!!

Maegan couldn't wait to get in the water and play with the dolphins at the Moon Palace Resort. She was beaming from ear to ear that entire day and she kept coming up to me afterwards and just whispering...'Mom...that was the best day ever". Love making this kid's dreams come true...Cancun 2015
I had to print some photos from our adventure in Mexico...and when I realized how fun the papers from the Cloud 9 celebrate line worked with them...I got busy!! And even a little inky!!! LOL!! Had this great quote stencil so I sprayed my background before diecutting some accordian flowers...even added some washi tape...which FYI...if you've ever tried to cut and futz them together you know they are pretty finicky and come apart easily. I added the washi tape after I cut them out and the tape helped to keep the flowers from ripping apart AND added a fun design to the centers!! WAAHHHOOOOO!!! I'm learning to love washi tape for more than it's good looks!! LOL!!
Here is a pic of Maegan standing and RIDING Jon Paul and Carlo...
We were all excited for our ultimate dolphin experience but Maegan was almost vibrating with excitement! She absolutely LOVES dolpins and it has been on her bucket list for most of her 11 years. She was nervous and a little worried that they may attack her but from the moment she got in the water with them it was instant love. She couldn't have had a bigger smile while doing the foot push across the enclosure...and to have done this adventure with her Godfather truly made it THE Ultimate dolphin experience. Cancun - January 2015

Since it is washi awareness month here at Scrapbook Nerds I thought I'd play a little. I don't usually do the altered kinda stuff but my daughter needed a little something extra for her girlfriend's birthday gift so I thought this would work!
I covered the wood clipboard with washi tape and embellished with some of my Chic Tag paper scraps...It was a big hit and she loved it! Best of all...it was super easy!! It started out as a photo frame...I covered white cs with washi tape and die cut the "C" and the leaves...


But then my daughter realized she didn't have a photo she could put in it...so it became a note pad holder and card! LOL!!

Ready for a little spring? Need to brighten your day? Pick up some of these Cloud 9 designs from Scrapbook Nerds and get creating! Here's an exclusive discount for my friends, that's you! at ScrapbookNerd.com receive 15% off your whole order when you use this code before the end of March : Kim15


Be sure to link your project back here to share with the rest of us! Thanks for letting me share!! WAAAAAAAAAHHHHHOOOOOOOOOOOOOO!!!


Wednesday, March 4, 2015

PSSSSSSSTTT.....


just sayin...

Tuesday, March 3, 2015

Gooooood morning ladies!!

Today's tutorial is of the cutest little purse mini album...
I know I know...I said I don't do mini albums but this gold embossed paper from the Cloud 9 Celebrate line demanded some attention of it's own ...so here is the cute purse shaped mini album I created with them....easy peasy!!


You are going to need...
- a single sheet of cardstock or heavy weight patterned paper (it's going to need to stand up to being handled and folded) 
- ruler
- stylus
- pencil
- bone folder
- option...you can also use scoring blade on your trimmer or a scoring tool
- hole punch
- ribbon
- Velcro dot
 - redline sticky tape or good adhesive of your choice
 - coordinating piece of cardstock 5.5" x 4"
option - Die cutting label shapes or border punch


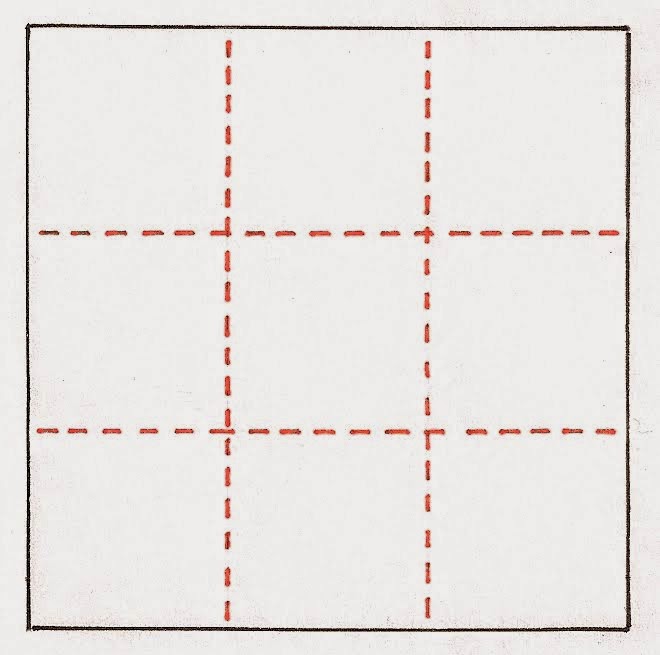
1. Start with a piece of 12” x 12” piece of card stock. On one of the 12” sides, score at the 4” and 8” marks. Turn the card stock ¼ turn, and score at the 4” and 8” marks again.


Score each of the corner squares diagonally from the corner to the nearest intersection of score lines. You can do this with a ruler and a stylus tool or bone folder, since this step may be difficult to do on your regular scoring tool.


Score the left and right middle boxes, from the 6” mark on the edge of the card stock to the two closest intersecting score lines.


For the topper, cut a 5.5” x 4” piece of coordinated cardstock or patterned paper. On the 5-½” side, score at the 2.5”  and the 2.75" mark.  Here is where you can get creative with either a larger label die or border punch to fancy up the "flap" of your purse.


Punch two holes a half inch in from each side in between the score lines
Add your ribbon "handle" and knot. Adhere the flap to the back of your "purse"


Remove the backing from the Velcro dot and stick to the front flap of your purse. Close the purse (tucking in all the folds).

Embellish as desired! Have some fun with it!
Loved how perfect these papers were for my godson's wedding...soooooo pretty!!


Here's an exclusive discount this month for my friends, that's you! at ScrapbookNerd.com receive 15% off your whole order when you use this code : Kim15

Happy creating!! WAAAHHHHHHHHHHOOOOOOOOOOOOO!!!


March DT Reveal over at Scrapbook Nerds

Good morning Nerds!
Do you ever look at your papers and know exactly which photos will work and then have your page just come together with no frustration and second guessing? Well, that's what happened to me with these yummy Cloud 9 papers and embellies! I opened my pizza box and a couple of hours later...three projects that I'm happy to share! These papers and embellies are so fun and colourful...the perfect break from the blustery cold that's outside!!
Here is my first layout...a quick one using more of those delish MFT dies...this time straight to my heart and love. I love being able to use theme related products other than the theme that they are intended for! Here is Island Love...photos of my daughter at Centre Island, a favourite annual tradition.
20150022Kimprojectstrip
My second project went together even quicker than the first one! The colours of these Cloud 9 papers really inspired me...so much so I even got a little dirty! Love this line...it really is "good stuff"!
Here are my girls being sweet and sassy in Port Elgin...
20150042Kimprojectstrip
And finally the gold embossed papers in this line demanded some attention of their own...so here is the cute little purse shaped mini album I created with them....easy peasy!!


Kimprojectstrip
Ready for a little spring? Need to brighten your day? Pick up some of these Cloud 9 designs and get creating! And as a special BONUS....Here's an exclusive discount for my friends, that's you! at ScrapbookNerd.com receive 15% off your whole order when you use this code : KIM15
Be sure to link your project back here to share with the rest of us! Thanks for letting me share!! WAAAAAAAAAHHHHHOOOOOOOOOOOOOO!!!

Friday, February 20, 2015

My February DT Reveal over at Scrapbook Nerds

Creative Team @ scrapbooknerd.com
Kim @ ScrapbookNerd.comI had a great time playing with the All Bundled Up line from Carta Bella this month!
This one is super simple and I just let the yummy papers take center stage. I cut the patterned paper into strips and just laid them on a diagonal. Embellished with the most delicious snowflake dies from MFT and Quickutz (Lifestyle crafts) as well as the beautiful bow die from My Favorite Things.
This is a page about my daughter's haircut...
You had been bugging to shave your hair and get a hair tattoo. So much to grandma's dismay, I let you do it! I was worried about the kids at school teasing you but you RAWKED it!! It is so you. It suits your funky quicky personality and unique sense of humour. I love that you are confident enough in yourself to set yourself apart from the rest and be true to yourself. Love you and the new do! December 2013
Be YOUnique scrapbook layout by Kim scrapbooknerd.com
Well I can't do a layout for one without doing one for the other!
Here is my daughter Caitlin...beautiful inside and out!
LOVE LOVE LOVE the beautiful colours of the papers in this collection! Also used the jumbo beautiful bow die from My Favorite Things and the swirled border die from Quickutz (Lifestyle crafts)
BeYOUtiful layout by Kim scrapbooknerd.com
As soon as I saw the kit from carta bella in my pizza box I knew I was making a mini album with it! I admit I don't do mini albums...I love them when other people make them but I struggle with the smaller scale. However it couldn't have been any easier!!
Paper bag book by Kim scrapbooknerd.com
Last but not least, a fun layout with all of my bits and scraps...I even used the bar code strips!! Waste not want not!! LOL!! This is Team Dirty Girls taking over the slopes at Chicopee...There is no one louder, faster or having more fun!! TDG!! WAAHHHHOOOOOOOOO!!
Winter layout by Kim scrapbooknerd.com
 
ScrapbookNerd.com

Tuesday, February 17, 2015

Waterfall Album Tutorial

Good morning ladies!
Today over at Scrapbook Nerds I am sharing a how-to on creating a super cute and super easy waterfall album made from paper bags!! Yep! They aren't just for lunches anymore!! As soon as I saw the kit from carta bella in my pizza box I knew I was making a mini album with it! I admit I don't do mini albums...I love them when other people make them but I struggle with the smaller scale. However it couldn't have been any easier!! The papers and embellies in the All Bundled Up line made this go together in a snap! But first...let's make the album!
Paper bag album by Kim acrapbooknerd.com
You will need...
2 paper bags
Bone folder
sewing machine ( I used a machine but you could also do this by hand)
Assorted papers and embellies to decorate as you wish
The example below uses only 2 paper bags and will create an album with 4 different length pages.
1. Take your paper bag and measure the length.
(I used bags 11" long.)
Divide the length by 5.
This will give you the width of the first page which will be 2.25" for my example.
length 11" / 5 = 2.25"
2015611
Lay the 2nd bag on top of the first bag keeping the folds aligned
 Carefully sew along the crease to form the spine of the album.
IMG_20141229_004132
Once you have sewn your spine your waterfall paper bag album should look something like this album in the photo. Embellish pages as you wish.
1419963990582
Tips:
Don't be afraid to use your punches to clean up the edges of the bag and create "peek a boo" interest.
I made page 3 into a pocket by gluing the top and bottom edges only of the "bottom" of the paper bag
The "insides" of the bags make great pages but if you need more space for photos or journalling you could add another "waterfall" page inside the pocket. The gusset of the bag allows for lots of room!
Paper bag album by Kim acrapbooknerd.com
2015603
2015604
2015605
2015606
2015607
Give this a try and be sure to link your projects back here!
Thanks for letting me share!! WAAAHHHOOOOOOOOOOOO!!!

Sunday, February 15, 2015

WHOOOOOOO loves a tutorial?

Good Morning Nerds!
I'm Kim and this is my first blog post over at Scrapbook Nerds.
I'm super stoked to share a cute little project tutorial with y'all!
I don't know about you but I love corrugated cardboard!
You can paint it, punch it out, even use it as a stamp...its so yummy to play with!!
Today I thought I'd use it to create this cute little guy.
I think this would be great fun to do with kids...
tutorial by Kim @ scrapbooknerd.com
You will need...
Corrugated cardboard
Scissors
Trimmer
Liquid adhesive
Small heart punch (optional)
Hole punch
Bling
Leaf punch (optional)
Bakers twine or thin ribbon
Use your trimmer to cut 6 strips of corrugated cardboard (12"x 0.5") I found that cutting it backside up made things much easier and didn't crush the paper. Roll 2 of the strips with corrugated side out. You will use these to make the eyes.
tutorial by Kim @ scrapbooknerd.com
Next roll the 4 strips with corrugated side out...one after another to create a larger roll for the body. I used liquid adhesive as I was rolling to keep roll tight. You can use an elastic to hold until the glue sets or just hold in your hand.
Glue the eyes to the top of the body.
Next I cut a small square and hole punched the middle. Then attach to the back of your owl so that the hole is accessible. Thread bakers twine or ribbon through hole to hang your owl.
tutorial by Kim @ scrapbooknerd.com
Cut eyebrows of your owl. I cut them freehand but you could use a
mustache die or punch as well.
tutorial by Kim @ scrapbooknerd.com
Next using a leaf punch punch cut the leaves from corrugated paper. You could also cut them freehand. Attach to the front of the 'body'.
tutorial by Kim @ scrapbooknerd.com
Punch small heart and add as nose.
Add bling as eyes. You could also use googly eyes! So cute!
Add him to a tag or gift and enjoy!!
tutorial by Kim @ scrapbooknerd.com
Thanks for letting me share!
Be sure to share your owls by linking them back here. I'd love to see them!!
Waaaahhh-hoooooooooo!!
ScrapbookNerd.com